Sunrise Strip Rag Bag
- Sharon Prigan

- Aug 29, 2025
- 3 min read
Creating something special for a young student’s birthday is always a delightful experience. Recently, I crafted a unique gift for one of my talented students who was excitedly anticipating her special day. She knew I would be making something personal just for her, and when I asked what she wanted, her eyes lit up.
She had seen me working on a beautiful sunrise pattern and noticed the colorful strips that were left over after completing my tutorial. They always go through my fabric scraps when they come to class.

With a sparkle in her eye, she asked if I could create a sunrise strip rag bag using those sunrise fabric scraps. I loved the idea and told her that she would help me create it. This wasn’t just a gift; it was a chance for her to learn the technique and engage in the creative process.
The Inspiration Behind the Sunrise Strip Rag Bag
The strip rag bag is not only practical but also a great way to repurpose fabric scraps. As a sewer and quilter, I often end up with leftover pieces that I can't bear to throw away. The sunrise pattern, with hues of orange, pink, and yellow, made the perfect choice for this project.
Involving my student in the creation of her bag was a good learning experience for her. I wanted her to feel ownership and pride in her work. It’s essential for young artists to understand that creativity isn’t just about the final product; it’s also about enjoying the journey of making.
Gathering Materials
We needed to gather all the materials before sewing. Here’s a quick list of what we used for the sunrise strip rag bag:
Fabric scraps: Colorful strips leftover from the sunrise pattern.
Sewing machine: With a straight stitch for sewing the strips together.
Thread: She chose a fuschia pink color for a standout seam.
Scissors: Essential for cutting any additional fabric if needed.
Iron: To press seams flat for a neat finish.

Having everything organized made the process smoother and more enjoyable.
The Creative Process
With our materials ready, we dove into the creative process. I explained the steps to my student and emphasized teamwork. Here’s how we approached it:
Choosing the Layout: We spread the fabric strips on the table and experimented with different layouts. This part was creative fun, as we could see how the colors interacted. We looked at a number of different options and I allowed my student to decide on the color placement of the strips, which added her personal touch to the bag.

Cutting and Preparing the Strips: We cut the strips and she decided on a number of different lengths. With the strips ready, we began sewing. I demonstrated how to place the strips, and then she took over and sewed the rest of them She still wanted to decide how to quilt them.

Cutting and Sewing Pockets: We also lined the bag with 2 pockets on either side. She agreed with me that a girl can never have too many pockets!!
Sewing the Bag Strap: She sewed the strap from more remnants and chose buckles and sliders from my boxes of recycled pieces.
You can see how she connected the adjustable strap here -
https://www.youtube.com/watch?v=y5MUtbWxAP0

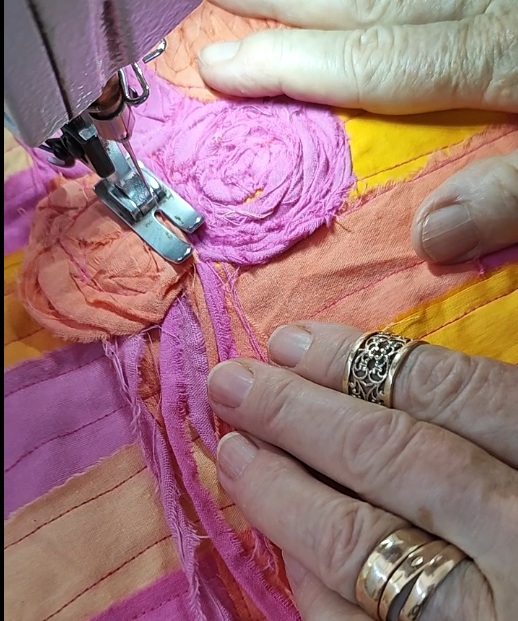
Decorating the Bag: After sewing the strips, I sewed some rose floral applications and she told me to decide on how it would look.
Finishing Touches: Finally, after ironing the top edge of the bag she added a top stitch around the edge. Not only did this add durability, but it also gave the bag a finished look.


Throughout the process, I encouraged her to express her creativity. The project was a true collaboration and she got the bag that she wanted.

Wrapping It Up
Creating a sunrise strip rag bag was more than just a sewing project; it was a wonderful opportunity to bond with my student and share the joy of crafting. By involving her in the process, I know that I am inspiring her to continue exploring her creativity and to appreciate the beauty of handmade items.
If you’re a sewer, quilter, or patchwork artist, I encourage you to take on similar projects with young learners. You will pass on valuable skills and create lasting memories, all while enjoying the satisfaction of crafting together.
Next time you have some fabric scraps lying around, think about turning them into something special. Whether it's a bag, a quilt, or another project, the possibilities are endless. Happy sewing!

If you would like to make a bag of your own you can find the tutorial here
and here on the site - https://www.priganart.com/product-page/strip-rag-bag-sewing-tutorial-pdf-tutorial-instant-download


Comments